Renderings for Interior Design: See The Creative Possibilities
- Samia Verbist

- Dec 15, 2022
- 4 min read
Updated: Dec 17, 2022
Spatial planning and picturing new features and styles in a home are skills every designer and architect must hone. Becoming great at imagining what a space could look like takes time, experience, and practice.
No designer expects her client to bring these skills to the table. In fact, this type of visualization is one of the essential values a homeowner gains by working with a designer.
But that doesn’t mean you won’t have the chance to “see” the possibilities of your space. To move beyond presenting mood boards and sharing fabric swatches or tile samples, we can create 3D renderings.
These renderings will give you the best preview of how your renovation will look with the actual finishes and furniture in your home.
Before we examine the benefits of renderings for interior design, what is rendering?
What Are Renderings For Interior Design?

I find renderings an excellent way to bring my vision to life for clients. A rendering offers so much more than a 2D floor plan. It gives a clear picture of a finished design with all elements created from the products specified and put into the design at scale.
When working on a project, I have a vision in my mind that I can share with clients in many ways. But when they need to see it clearly before making big decisions, a rendering can allow them to do that. Rendering in design can be particularly helpful when there's an unusual transformation. If there is hesitation or trepidation from a client, I know it is time for a rendering.
However, making a rendering is not an automatic step when I work on a project because it takes a lot of time and effort. Rendering in interior design is more than just a sketch-up of a space with updated finishes; it’s a full-scale design.
How 3D Interior Design Renderings Are Created
While it may seem like an early project task, creating a rendering does not happen at the beginning of the design process.
In fact, it comes almost at the end. To make a rendering, I must have already designed and selected all elements. The rendering shows the selections together in the space.
The first step in the rendering process is taking comprehensive measurements. That means all the walls, doors, windows, ceiling height, and other architectural elements.
With those measurements, we create a layout, or floor plan, on the computer. This layout will include any structural changes we plan to make to the space.
From there, we build up, adding three dimensions with walls and vertical structures.
Next, all selected elements and materials, such as cabinets, surfaces, furniture, lighting fixtures, or a fireplace, must be modeled in 3D. One reason you must specify the design is that each piece has to be created individually.
Occasionally, we get lucky, and a company has 3D models of its products, but this is not the norm. Instead, we work from the spec sheets for each product to build them on the computer. We then incorporate them into the room layout we have already made.
That is where the magic happens.
As you can see, 3D rendering is an intensive process, but the result is worth it. The client will get a close impression – about 90% accurate – of what a design will look like in their space.
Next, I’ll show you just how precise these renderings can be.
See For Yourself: Interior Renderings
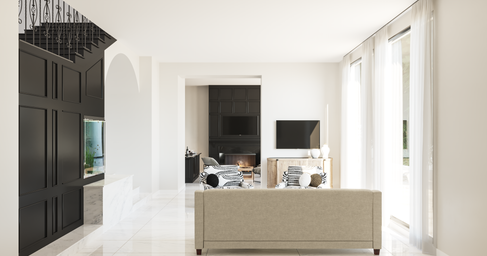
In this Newport Beach, California, home, the clients wanted a dramatic look.
I thought their living room and entertaining area would be incredible, with a black fireplace, bar, and staircase. I could imagine how those would contrast excitingly with the white walls and marble floors. But a lot of black paint can be a hard sell to clients.
My solution was to create renderings for them, so they could see how it would look before committing. I made two versions, one with black features and one with white features. While the white was perfectly stylish, the black brought in the striking design they craved, and we all agreed to go for it.


Here is another example of a rendering that helped a client get comfortable with an out-of-the-ordinary design.
Clearly, the Calacatta Antique porcelain tile that stretches from floor to ceiling in the enclosed shower is the most dramatic feature in this bathroom.
The clients loved the large-slab tile but weren’t sure how much they wanted. Not only did I recommend using it for the shower, but it also tops the custom vanity I designed. And I wanted to highlight it with gold fixtures throughout.
After seeing all elements pulled together in the rendering, the clients could imagine being in the space. They could see how the tile would be breathtaking but not overpowering because it was paired with other more neutral features.
They said yes, and you can see the real-life version looks nearly identical to the rendering.


Exterior Renderings
We also provide exterior renderings, which could be a vision of what a home will look like when changes are made to the structure. Or with updated details like windows, doors, or paint color.
Exterior renderings might focus on a specific outdoor space, like this rendering, which shows an enticing and spacious balcony with a spectacular ocean view.
To create these images, I measured all outdoor areas, including features like the pillars and the steps. I then recreated the entire house and surrounding landscape.
Then I used specifications for flooring, glass enclosures, and ceiling fans. I chose the furniture and put it all together. Like all good 3D renderings, it is done to scale and offers a realistic depiction of the sweeping outdoor area.


Let’s be imaginative. Let’s be bold. And, of course, let’s be beautiful.


Comments